Push House: Maximize Your ROI With This Push Ad Network
What is Push House?
Push House is a leading self-serve push notifications ad network with some hot traffic sources for your adult and mainstream offers.
With over 525M active subscribers and 14B daily impressions, Push House’s got everything you need for success.
This RTB platform means you can bid on traffic in real-time and see your stats appear live from the dash, as they happen.
Advertisers can bid on traffic in over 180+ Geos for a share of the ad network’s 31+M daily clicks.
One of the top advantages of Push House is the uniqueness of users and the high quality of traffic. The ad network approaches this in a unique way, and we’ll look at how you can get the best results from using it in just a while.
Push House also has some innovative targeting features that allow you to apply precision targeting to your campaigns and identify top-performing feeds for your offers.
Put this all together, and you’ve got a turbo-charged Push ads platform that’s like a license to print money.
What are Push Ads?
Push ads are one of the hottest ways to profit from affiliate offers right now.
They’re easy to set up, have bot-free traffic, can be targeted to users who are ready to click, and work in all verticals.
This makes Push ads a no-brainer for newbies who are just starting out or well-seasoned pros who wanna increase their volume and boost their ROI.
In the right hands, they’re literally a money-making machine. They have a high click-through rate (CTR), low cost, worldwide coverage, and instant delivery – making them an all-round great choice for advertisers who wanna step things up to the next level.
In fact, if you’re not using Push Ads as part of your revenue strategy, you could be missing out on megabucks.
So what’s the best way to get started?
Well, first of all, you’re gonna need to find a Push ad network with a large volume of high-quality traffic and killer targeting options.
In this review, we’re gonna take a look at one of the leading Push ad networks, Push House, and show you why you might wanna choose them to scratch your Push ad itch.
Getting Started with Push House
One of the things I liked about Push House was how easy it was to get started. Everything has been carefully thought out and the process is seamless from start to finish.
The website has a clean and fresh look and is super easy to navigate – just click the Signup button on the homepage to create your account.
If you wanna go ahead and do that now so you can follow along with the rest of the article, click the link below. I’ll wait here for you while you do that before moving on.
>>>Register with Mobidea’s exclusive Push House coupon to claim an extra 10% balance.
OK, we’re back! See how easy that was?
Also, don’t forget to click the verification link sent to your email so you can access the platform.

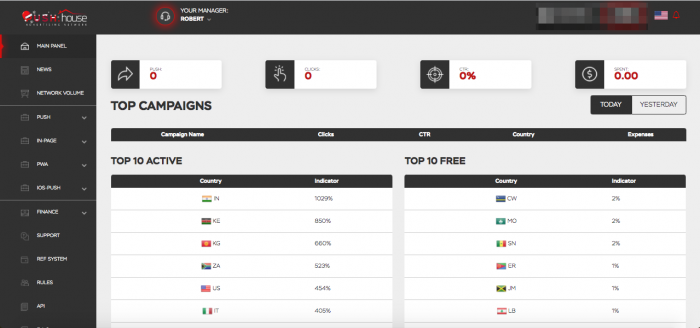
So the first thing you’re gonna see when you login is the dash. This is the main panel of your account.
From here you can see your impressions, clicks, CTR and ad spend, along with a summary of your top campaigns for the past two days. You can also see the Top 10 Active and Top 10 Free Geos from this tab.
You’ll see your account manager and moderator from the top navbar, along with your name and the value of any funds in your account.
If you click on your name you can edit your personal data, and enter your Telegram ID for notifications.
You’re gonna notice that a few texts still have to be translated. Although their team is working on having all of that in place, it isn’t a huge deal breaker as you can always use Google translate to understand the tool tips where they are written in Ukrainian.
Here’s a quick breakdown of each tab and what it does:
Main Panel: Clicking on this will redirect you to the main page of the site.
News: Here you can find the latest news.
Network Volume: See the actual volume of the traffic for all ad formats during the last 24 hours.
Push: This opens a drop-down menu for everything you need to work with Push advertising.
In-Page: This opens a drop-down menu for everything you need to work with In-Page Push advertising.
PWA: This opens a drop-down menu for everything you need to work with PWA advertising.
IOS Push: This opens a drop-down menu for everything you need to work with IOS Push advertising.
Finance: In this tab you can top-up your balance or use a promo code.
Support: Use this tab if you need help with solving a problem. Create a ticket and the support team will come back to you as soon as possible.
Ref System: Push House has a referral system with a 3% commission for all the spending that your referrals make on the network. To see your referrals, your referral income and your referral link, click on “Ref System”.
Rules: Make sure to read through them before starting.
API: Here you can find your unique API key.
F.A.Q.: If you have any questions, you can search for them here to see if there is already an answer for it.
Topping Up Your Account
Before you can run ads on Push House you’ll need to add funds to your account.
To do this go to the “Finance” drop-down menu and select “Top Up”.
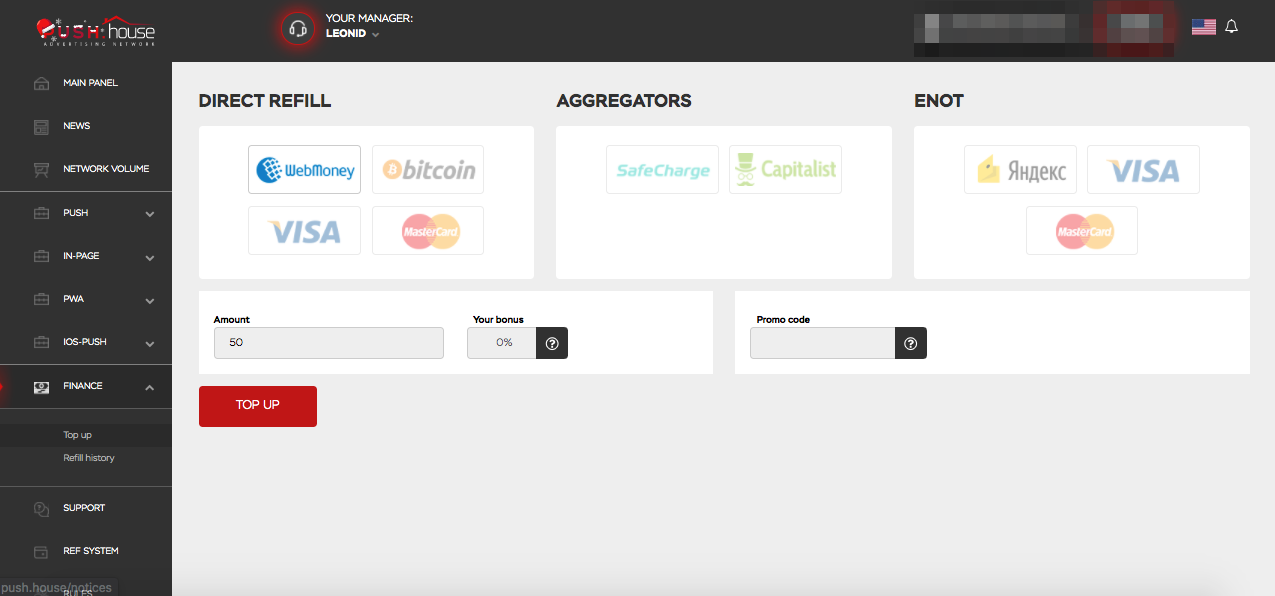
There’s a wide range of payment options you can choose from such as WebMoney, Visa Card, Bitcoin, and others.
Keep in mind that the minimum deposit is $50. This is also the screen where you can enter a promo code if you have one.
Note that in order for the promo code to work, you first have to make a deposit. The promo code field only displays until you first use it, then it disappears.
For the rest it’s pretty self-explanatory, so let’s move on to creating your first ad.
How To Create a Campaign on Push House
While you may be tempted to jump right in, Push House recommends that before creating your campaign, you should inspect the network volume and CPC for all the available GEOs.
To do this, click the “Network Volume” tab to see the amount of traffic registered during the last 24 hours for all GEOs.
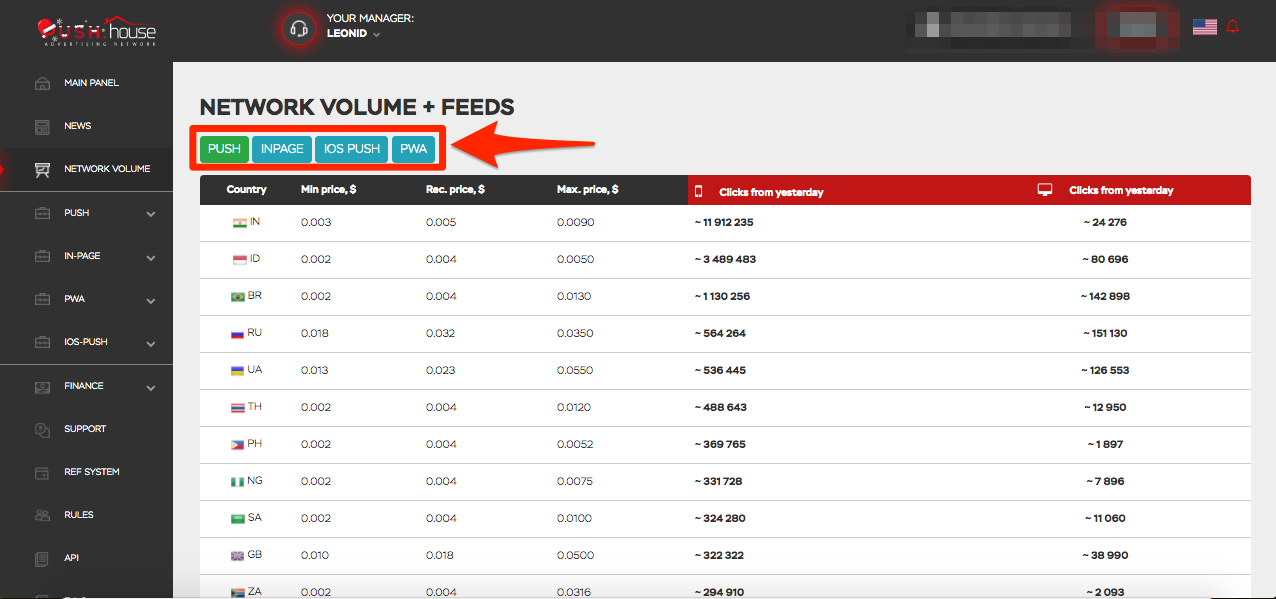
You can use the four tabs above the statistics table to select which of the 4 ad types you wanna see the stats for.
Now that you’ve got a pretty good idea of which GEO you wanna target, open the “Push” drop-down menu and select “Create Campaign”.
This is the page where you will be setting up your first ad campaign. As it’s full of details and various targeting options, we’ll dissect it into smaller pieces so you can get a feel for the whole process.

The title and the link of your ad:

Title: This field is where you choose a name for your campaign. This can be whatever you like and only you will see it. Make sure to use a name that will be easy for you to understand and look up in the statistics table.
Link: Your affiliate link goes here. This field uses macros that can give you insight into the users that clicked on your ad.
Let’s a closer look at these macros and what they do:
Advertisement

- {site} – This macro shows which site the user got the push notification from. It is useful when you wanna know what sites are profitable and what sites are eating into your balance without any returns. Once you know these sites you can put them into blacklist later on, to cut away not profitable traffic sources.
- {camp} – This macro shows what ad campaign the user clicked on. It comes in handy when you wanna know what type of ads convert better, so you can get rid of the ads that don’t convert well.
- {pdpid} – This macro tracks the subscription age of the user. In Push House all the traffic is divided into segments by the subscription age. This means that you can choose which segment of the traffic you want to target.
- {price} – This macro tracks the price of the click made by the user on your ad.
- {feed} – In addition to the traffic that Push House has, there is also a large amount of traffic driven from the feeds. This macro gives you more insight about the feeds and their traffic quality.
- {country} – This macro shows you the country where your ad is displayed.
- {city} – This macro shows you the city where your ad is displayed.
- {os} – This shows you the OS of your traffic.
- {lang} – This macro is used to see what browser language your traffic is using.
- {browser} – This macro can track the browser used by your traffic.
- {format} – This macro is helpful when you run multiple campaigns in different formats. It can tell you what format converts better.
Countries, Prices and Devices:

The first thing you wanna do here is to select the country you wanna target.
As soon as you do this, your CPC will immediately default to the minimum CPC allowed in the country you have selected. Feel free to change that if you wanna increase your bid.
Next, in the City drop-down menu, you can include or exclude cities if your offer needs that.
Now let’s move to the Devices section.
Device: From this drop-down menu you can select whether you want your campaign to be targeting mobile or desktop devices.
Subscription age: Here you can select the segment of traffic based on the subscription age. The newer the subscription, the higher your CPC will be. This comes from the idea that a newer user is far more likely to click on the ad and convert than a user that has been receiving push notifications for some time now.
OS version Android: Here you can target a specific Android OS.
Browser language: This is a super useful targeting tool for when you wanna target a specific part of the traffic from a country that has more than one language.
Your Actual Ad:

After setting everything up it’s time to create your actual ad.
Before doing anything, you can go to “Ready Sets”. These are like a small in-house spy tool that gives you access to hundreds of pre-made creatives.
These can give you an idea about ads other people are using in your niche. If you need more detailed analysis, you can check their free spy tool, Spy House (Russian Only), that gives you even more updated and detailed info about the push ads used by your competitors.
Title: Enter the title of your ad. Note that the maximum number of characters allowed in this field is 30 characters. Try to keep it short and catchy to get more clicks.
It’s also a good idea to use emojis here as they are proven to boost the CTR.
Text: This is the body of your ad. The main message of your ad should be here. The maximum character limit allowed here is 45. You can also use emojis here if you like.
Tip: You can insert two macros into Title and Text which are {CITY} and {COUNTRY}. If used, these macros will automatically change into the city or the country of the user to whom the ad is displayed. This is a great way to introduce a greater degree of personalization into your ads.
Icon: Here you can upload an icon for your ad. The icon is a small image that will be displayed at the side of your ad, next to the title and text.
Image: This is where you can upload the main image for your campaign. It’s a larger image that is used to draw more attention and give more information about the offer you are promoting.
Tip: The image won’t always display the same way across different devices. Some crops might be applied from the top and the bottom of the image, so always try to put the most important information in the center of the image.
Scheduling:

This tool helps you run your ad on specific days of the week or at specific hours of the day if it is needed for your offer.
It could be that you wanna run your ad at the offer’s call center working hours, or maybe your offer needs to be run on specific days or because you are seeing low conversions at certain times. No matter what the reason, here you can check and uncheck any hour of the day you want.
Note that the timetable is set to UTC +2 – so don’t forget to convert the local time of the offer to UTC +2 when you are scheduling your ad campaign.
Ad limit:

This section is made for you to set limits for your campaign. It’s divided into four fields, let’s look at each one a bit closer:
Total budget limit in $: Here you can set a total budget for your campaign. Due to the nature of the push notification ad format, the limit can be overrun. The minimum limit is $10.
Daily budget $: If you need your campaign to spend a specific amount of money daily, set this here. Due to the nature of the push notification ad format, the limit can be overrun. Minimum limit is $10.
Total clicks limit: This is another way of limiting your campaign. Instead of setting a limit in dollars, you can set it in clicks. If you need only a specific number of clicks, to test your campaign, for example, you can do it here. Due to the nature of the push notification ad format, the limit can be overrun.
Daily clicks limit: If the nature of your offer allows only a specific number of daily conversions, this field will help you to set it here. Maybe there are caps for the offer you run, so this might come in handy with that.
Audience:
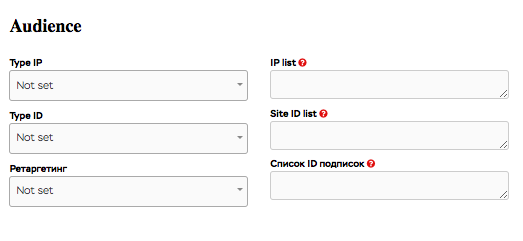
This section focuses on your audience. It includes the sites they come from, their subscriptions and whether you want to exclude these sites/subscriptions or get more traffic from them.
Before explaining how to set up all these parameters, we need to know what Black/White lists are and why we need them.
Let’s say you’ve started your campaign and you are driving traffic to your affiliate link for 3 sites. One tricky part of using Push House is that instead of names, these sites go by numbers. So for example the three 3 you are driving traffic from might be numbers 1, 875 and 23.
After your campaign has been running for some time, you need to check the statistics of your affiliate network or your tracker to see which sites are profitable and which are not (This will only be possible if you have used {site} macro in your affiliate link).
When you open the statistics and see an interesting thing, i.e. site 1 gave you 30 clicks, 4 of which converted, you can easily see that this site is profitable.
Site 23 gave you 50 clicks, 2 of which converted. This site is also profitable, but not as much as the first site.
Site 875, however, gave you 100 clicks and only 1 conversion. This is not profitable at all!
So what do you do? You need to get rid of it.
That’s when you can create a Blacklist and add site 875 to it. And voilá! You won’t get any more traffic from this site.
The more traffic you drive the more detailed stats you get and therefore more low-performing traffic sources can be added to your Blacklist.
The same strategy applies to Whitelists – If you see that some sites give you more profit than others, this usually means that these sites have a target audience that is a good match for your campaigns. You can put these into Whitelist to drive even more traffic from these sites.
So now let’s come back to the Audience section.
The first thing you need to know is that this section is divided into two columns
The column on the left is where you can choose what type of list you are making.
Each field is related to the list that it’s next to in the right column.
This means that the first field in the left column, which is “Type IP” where you can choose whether you want to create a black or white list, is related to its counter field on the right, which is where you will be inserting IP ranges you want to includeexclude.
The same goes for the Type ID field, which is responsible for the site ID or numbers, as we said before.
The last field is responsible for the Subscription IDs.
After deciding which type of list you are going to create, go to the counter field on the right and insert the data that you got from your stats. Let me show you how I created a small blacklist of the sites that were not giving me any profit.

In the picture above I wanted to only make only one Blacklist for low-performing sites. I first went to the left column, selected the “Blacklist” form Type ID and then moved to the field across from it, to input all the sites I didn’t want my campaign to run as these sites were not profitable for me.
The uniqueness of the campaign:
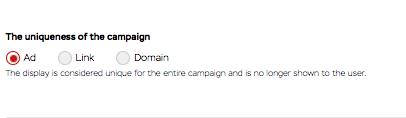
This small field has only three choices and will determine how your ad is going to be displayed to users.
Ad: If you select this, it means that once the user sees the ad, whether they click on it or dismiss it, they will never see it again. It’s the best choice if you are working with an affiliate network.
Link: If you choose this option, if the user got the ad with this link before, they will not get it again. You can try this out if you have a store where there are different links for different products.
Domain: The last option filters the uniqueness of the ad by the domain. So if several people run campaigns for the same site but are only paid only for unique visitors, this will help because it will never show the ad with the same domain for the same user twice.
The last step before launching:

Now just before you start your campaign, you have to do a couple of last steps to finish.
Push House moderates all ads to make sure there is no adult content on the creative. If you don’t want your ad to run right after moderation, check “Stop after moderation”.
Ad 18+: This is an important field that you must check for your ad to run. You have to choose whether your landing page has adult content on it or not, as this will help the platform to find the best target audience for you.
Allow feeds: Push House has tons of traffic but if you ever need more, you can check “Allow feeds” to get traffic from third-party databases. In order to do this, you need to have $70+ on your balance.
That’s it!
You’ve now completed all the steps necessary to get your ad up and running and get unique visitors to your offer.
Click the “Campaign List” tab to see a list of all of your campaigns and get detailed stats on your campaign performance from the “Statistics” tab.
Here you can break down your campaigns by targeting to see which options are performing for your best.
Wrapping Up
Push House is a respectable and well-designed Push ad network with a global reach and lots of high-quality traffic.
Its rich targeting options and easy-to-use interface makes it attractive for affiliates at all levels.
The inclusion of the Ready sets is a nice touch and being able to create ads by the uniqueness of the campaign opens up all sorts of possibilities.
Click the link below to get started with Push House and get 10% extra on the value of your deposit.
Pros
- Global reach
- High-quality traffic
- Excellent targeting options
- Creatives Ready Sets
- 24/7 support
Cons
- Newbies may find some steps difficult.
- No carrier targeting
Contacts
Email: push.house.partner@gmail.com
Skype: PushHouse
Telegram: https://t.me/publisher_push_house
Advertisement
